

How To Make A Fake Window For A Shed
How to brand shed window frames
Making shed window frames can sometimes be the only pick. It may exist that you need to replace some sometime garden shed window frames and tin't observe the right size or information technology may exist that you are building a new shed and just fancy building your ain window frames for a challenge.
Either way there are quite a number of details to sympathise and get right to brand sure that you get the sort of performance that you lot want. And so, lets accept a look at these details first and then become into the step by step process of shed window frame structure.
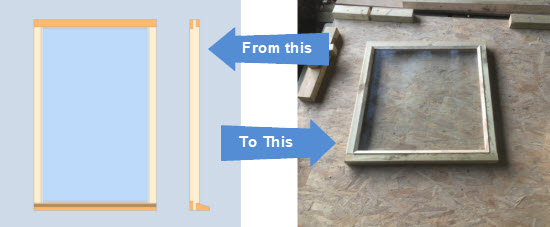 Shed window frames from concept to completion
What are some of the details required to make shed window frames water and weatherproof
The outset matter to accost is that these are shed windows, not house windows. They share many details common to all windows simply shed windows don't need to made to the same cost/functioning standards as firm windows.
Business firm windows are quite a technological marvel, having a host of standards and design practices to ensure that indoor living spaces are dry, draught free and durable. A shed window doesn't demand to perform to the aforementioned level as a house window, just they certainly do need to exercise an effective job of letting light into your shed whilst keeping the h2o out.
Making your own shed windows gives you the opportunity to salvage coin whilst also gaining an appreciation of the details that get into window construction, every bit well equally the huge sense of satisfaction of making something that will work well for many years.
The details that we demand to consider are:
- 1. What type of timber to apply for the shed window frame
- two. What size timbers to apply for the window frame
- three. What type of joint to use to connect the shed window frame members
- 4. The options for glazing your shed window
ane. What type of timber to utilise for the shed window frames
This depends on how long you would like your shed to last. The chief enemy of any shed window is the combination of water and sunlight. Sunlight repeated heats and cools the timber which over the huge number of cycles in a year causes the timber to split. Water will notice its way into any splits in the wood or gaps in joints and over the years will initiate disuse.
So, for whatever timber you choose if you lot tin can provide protection to the timber with regular maintenance and application of a practiced quality paint or stain then that will prolong its life.
Many shed windows are constructed from redwood timber and 'dip treated' against decay. Combined with regular maintenance and detailing this approach can give many years of service. In this project I use force per unit area treated (tantalised) construction timber. This isn't particularly fancy but gives a serviceable and durable window. If this was from a large window manufacturer so all the components would be force per unit area treated/tantalised afterwards fabrication and so that all the cut sections of timber were fully protected.
This isn't the example here, so if you are particularly concerned and your window is specially exposed and so treating all of the cut surfaces with something such as SikaGard Wood Preserver and painting prior to associates volition give additional protection.
2. What size timbers to use for the shed window frame
For the shed window frames in this example I used 45x45mm (2"x2") timber for the meridian and sides and a section of 95x45mm (4"x2") for the window cill. These members gave a good dimensional balance to provide the forcefulness and stability for a single glazed window and also reasonable dimensions for fitting the drinking glass and securing to the rough opening in the shed wall. Each of the sides and pinnacle member have a 10x15mm groove machined in them to adapt the glass and glazing dewdrop.
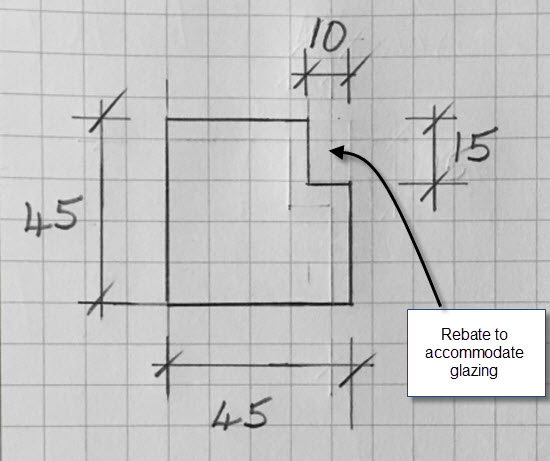 Typical section through timber for shed window frame
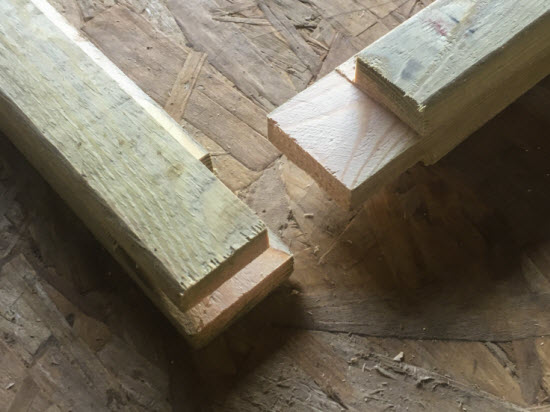
The window cill is a unlike department than the residual of the frame. Past machining the bottom department of the window out of 4x2", the cill and the window frame are fabricated out of a single piece.
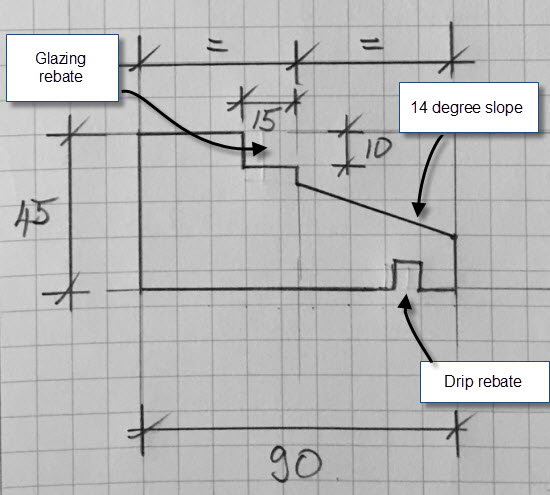 Department through shed window cill showing details
In that location are a couple of points to note hither, the slope of the cill and the drip groove.
one. The window cill is cut with a 14 degree slope to help information technology effectively shed the rain.
2. The baste groove on the underside of the shed window cill is in that location to forcefulness the water running downwards the window and onto the cill to drop off onto the basis, rather than continuing to flow underneath the cill and back into the shed.
Now I have introduced you to the various parts of the shed window frame permit's take a look at how to make them, fit them together and install the shed window into the wall of your shed.
3. What blazon of joint to use to connect the window frame members
The options for connecting your shed window frame members range from the simple butt joint to complex routered connections which require quite complex tooling. A quick overview of three types of shed window frame connectedness are:
The elementary butt articulation.
This type of joint is very minimalist and would exist frowned upon by many. However, I have seen it used successfully on sheds that I have repaired and so don't dismiss information technology out of hand immediately. The joint requires a small-scale notch to be cut in the cease of the ii horizontal timbers and the frame members are connected with screws as shown. Screwing into timber end grain isn't the strongest manner of connecting so if you lot wanted some additional strength then using pocket screws would exist a good addition.
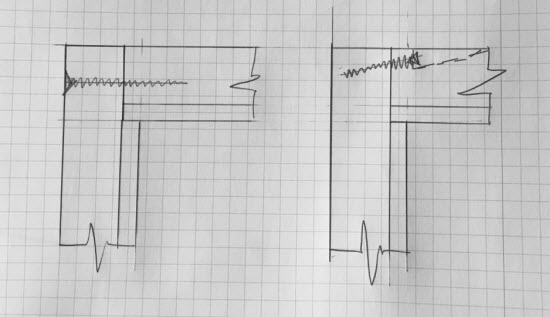 Detail of butt joint. Left manus side is with simple screw to secure frame members. Correct hand side is ameliorate connection using pocket hole spiral.
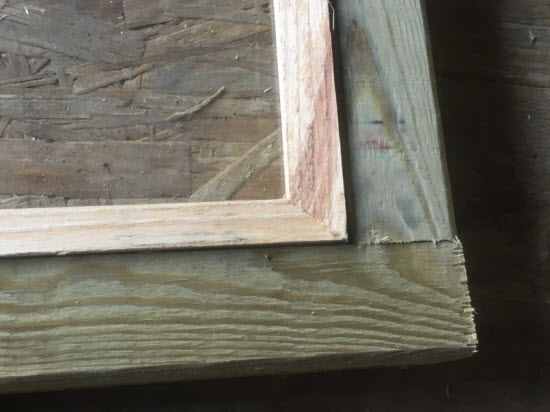
The 'bridle' joint.
This joint is similar to a mortice and tenon joint but with one end of the mortice open up. The joint is held in place with glue and can be further strengthened with a wooden dowel or star dowel.
 Particular of shed window frame articulation
Auto cut joint
A more sophisticated looking joint can be achieved past using track and stile router cutters this achieves a similar forcefulness to the bridle joint. But of course teh ultimate window making mechanism would be to apply a spindle moulder, but and then y'all are getting into the realms of house windows, which isn't what this article is nigh!
The barrel joint and the bridle joint can both be cut with a hand saw or saw bench. The machine cutting joint is cut either on a router table or spindle moulder. Then for this project I have shown the bridle joint which is stronger than the butt joint.
four. The options for glazing your shed window
Traditionally, drinking glass was held in in the window frame with metal glazing sprigs prior to applying putty around the perimeter of the window.
Many shed windows which are externally glazed don't employ whatever sealant. The glass is only placed in position and a glazing quadrant held in place with 15mm long pins. If you want a improve seal, or more likely to finish the glass rattling in the pane, then run a bead of silicone sealant around the perimeter of the glazing rebate before placing the glass. The seal between the glass and the frame will brand the articulation h2o proof.
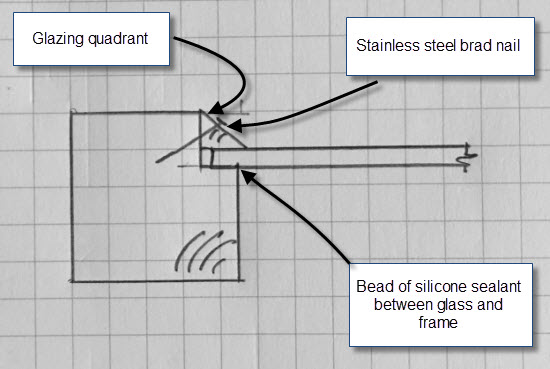 Section through window showing how glass is held in place
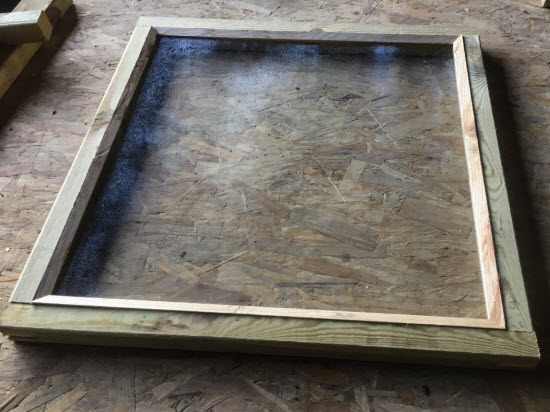 Completed shed window frame
The very simplest method of property the glass in identify is to merely create a slot on the inside face of each member of the frame. This allows yous to insert the drinking glass as you get together the frame. This is skillful in some ways for security as the glass cannot be removed without dismantling the frame. Nevertheless, if the glass gets broken at that place is no way of replacing the pane without removing and then dismantling the shed window frame.
Most frames don't accept this slot, but apply the rebate system. And the glass can be easily replaced if it becomes cleaved.
How to make a shed window frame step by step
The post-obit sequence is a shed window frame that I made using the drawing beneath.
The window is a stock-still, not-opening, window. Information technology is made from pressure treated timber, three sides are 2x2" and the bottom is machined from 4x2".
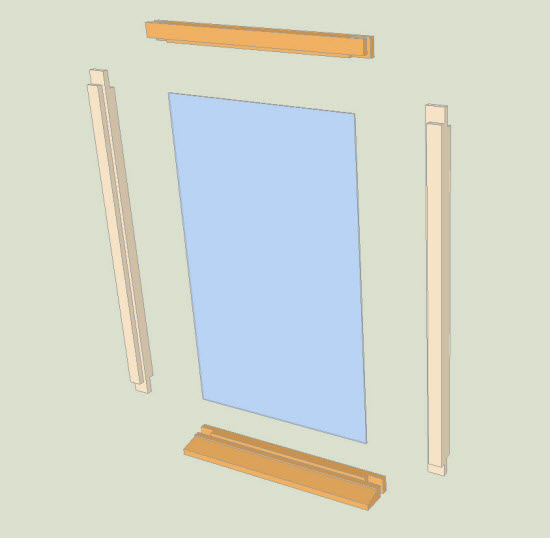 Components to exist made for this project
The members are joined using a bridle joint at the corners and glued together. The frame is then screwed into position to connect it to the shed frame.
The window is glazed with 4mm toughened glass plumbing equipment into a 10x15mm rebate effectually the frame. The glass is sealed around the perimeter using a bead of silicone sealant and then fixed in place with 10x12 timber glazing quadrant fixed with stainless steel brad nails.
So now that you know well-nigh the project let's get started:
The first step is to cut the members to length.
To summate the length, allow 2.5mm tolerance all round the frame.
For this frame with a standard 610x610mm pane of horticultural glass the frame members were 30+two.5+610+2.5+30 = 665mm long.
Every bit the window frame is to be square and then each member is the same length.
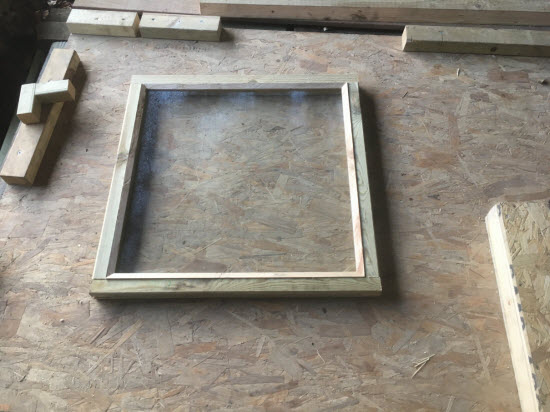
 Members cutting to length and with joints formed on the ends
A rebate is cut in each member of size 10x15mm to accommodate the glass and the glazing quadrant. This can be cut using a router in a router table or using a table saw.
The window cill section is cut using the bract of table saw set up to a 14 degree bending. The baste groove is cutting to 10mm deep and with three passes of the saw to grade a groove vii.5mm wide.
Now that you have the basic shed window frame stock, the next pace is to cutting the joints.
Cutting the joints
No special equipment is required to cutting the joints. It is perfectly possible to cut these simple joints with a hand saw and to use a hammer and chisel to remove the waste product where necessary. For this projection I used a table saw and some jigs to speed upward the cut process.
Equally with whatsoever woodworking project of this type accept slap-up care to mark out the joints and understand which department of woods is to exist removed before taking it out. Human activity in hast repent at leisure!
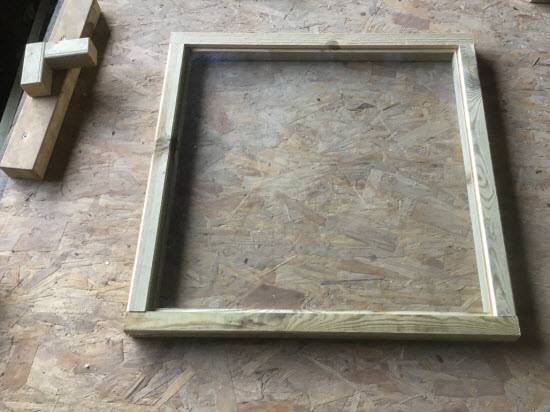
Once you have all the joints cut, check that they fit
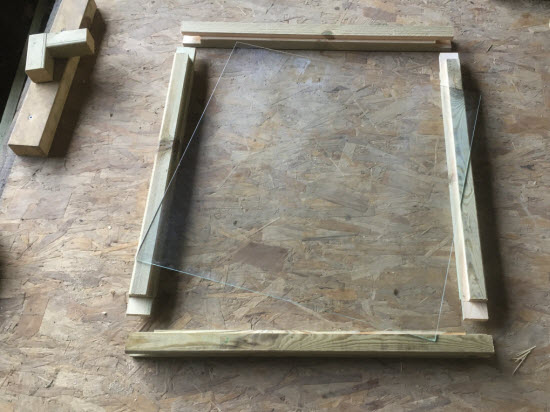
Dry fitting the frame
Try plumbing fixtures the four members together to check that they fit. Measure across the diagonals of the frame to make certain that the frame is square (both diagonal measurements the same). Also check that the drinking glass fits in the glazing rebate.
Gluing the parts together
When yous take ensured that all the parts fit together well information technology is time to brand the joints permanent. Before you start to glue brand certain you accept some clamps to hold the pieces in place before the glue sets. I used some adequately standard bar clamps, but you lot could use some straps to apply some pressure level if yous don't have these to manus.
I used some water proof polyurethane mucilage for the joints. Every bit well as being waterproof this expands into the joints and fills any pocket-size gaps.
 Window frame 'dry-assembled' with pane in identify to bank check the fit
Glazing the window
The glass is best fitted afterward the frame is installed into the shed. This is because if you are a bit rough with the installation information technology is quite hands possible to deform the frame and crack the drinking glass.
A bead of silicone sealant is applied around the edge of the rebate and the glass is then laid on to this. Another dewdrop is so applied to the perimeter of the drinking glass and the 10x10mm glazing quadrant fixed in place with stainless steel pins.
I cut my own glazing quadrant from a hardwood such as oak or sweet chestnut, which is resistant to decay.
 Completed window with glazing quadrant in place
 Shut up detail of glazing quadrant
Conclusion
Of course, yous don't have to be limited to a single paned window.
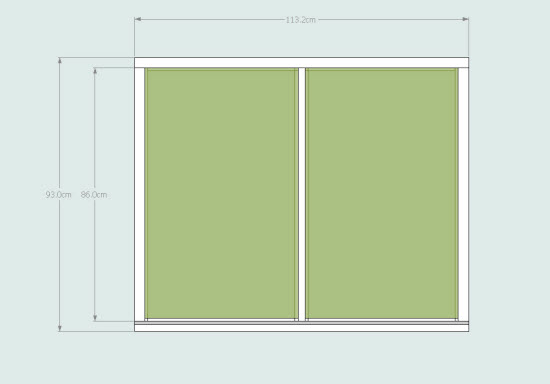 Window frame with two panes
I hope yous found this article useful for making fixed shed window frames.
If you would like more information let me knowand I can expand it to include opening, side or elevation hung shed window frames also.
More than information on the best type of shed window glazing tin can be found here.

Custom Search
Keep in touch with our monthly newsletter
Shed Building Monthly
Source: https://www.secrets-of-shed-building.com/shed-window-frames.html
Posted by: eastlandrodut1948.blogspot.com
0 Response to "How To Make A Fake Window For A Shed"
Post a Comment